WhatsApp API Chatbot Automation
Chatbot Automation
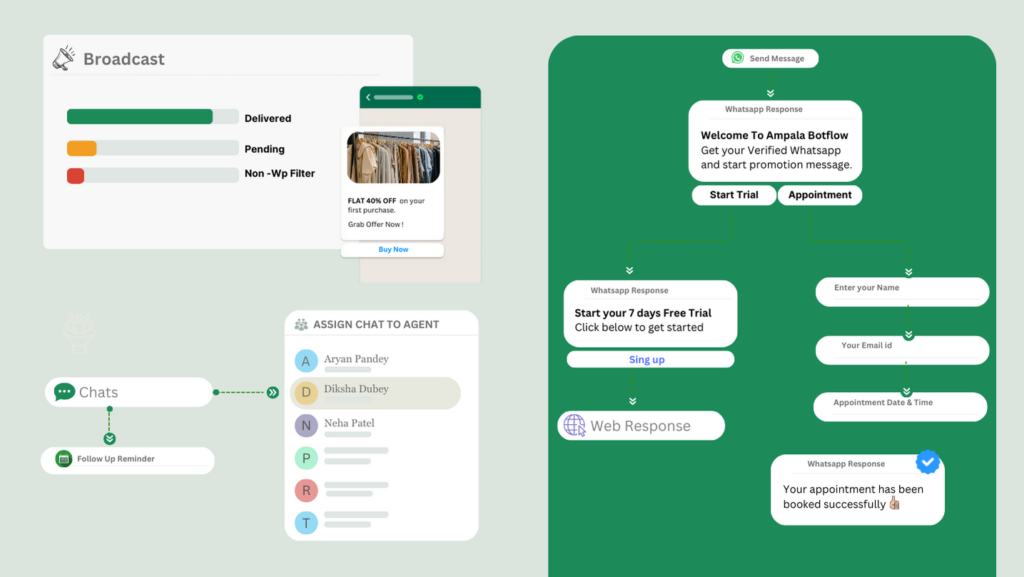
Create WhatsApp Chatbot Automation Workflows with drag and drop blocks APIs Call for triggers Setup buttons, links, options and more to get inputs from customers. Lead qualification, Auto-Data Collection, Auto-Segmentation, Schedule campaigns, Filter results like sent, delivered, failed, read and replied, Export results
Features Of Chatbots
Send Text Message
Send Media Message
Send Template Message
Send Button Message
Send List Message
Send Catalog
Send Single Product
Send Multiple Product
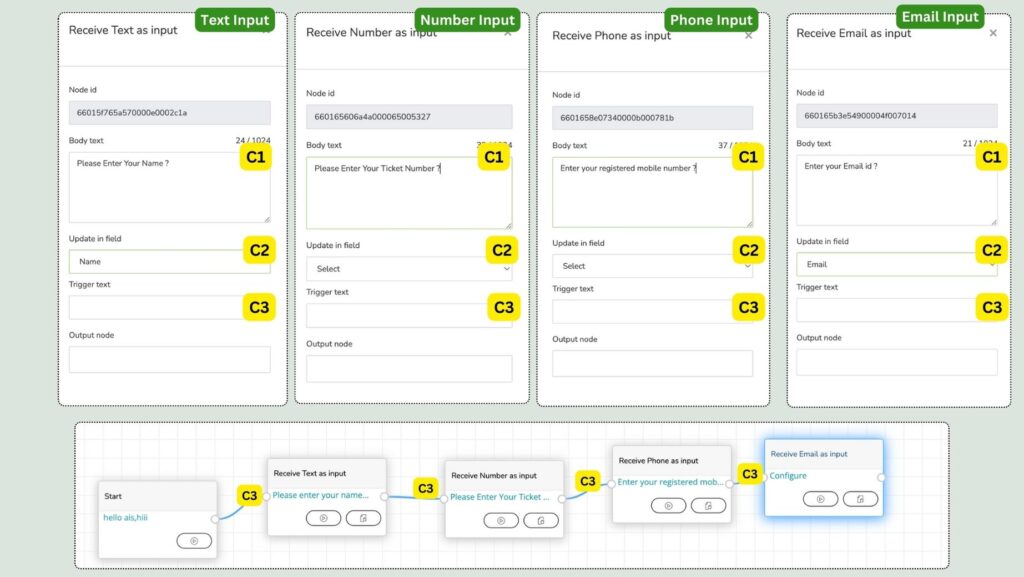
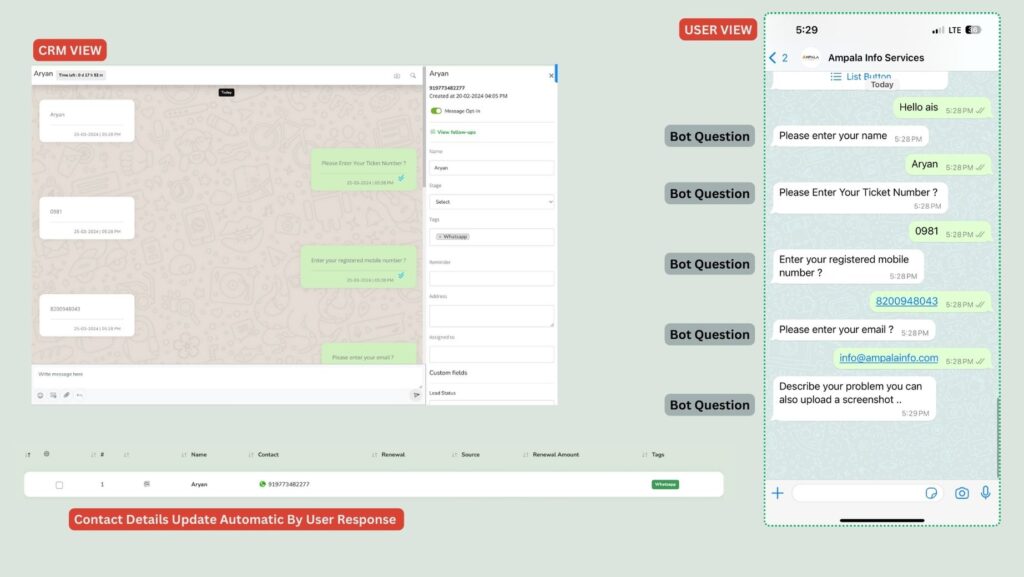
Input Response Message
API
Send To Google Sheet
How To Build Your First Chatbot
It is very easy process with ampala drag and drop tool to create a chatbot for your business
Step 1- First Bot Creation
By using the chatbot automation of WhatsApp API, we can automate the chats of our business so that whether we have to send details to any customer or have to do a conversation for support, all those processes will be done by this chatbot created by us, which will help in reducing the time spent in our business. Time will be saved, staff will not have to devote their time to all these things and our entire process will run automatically.
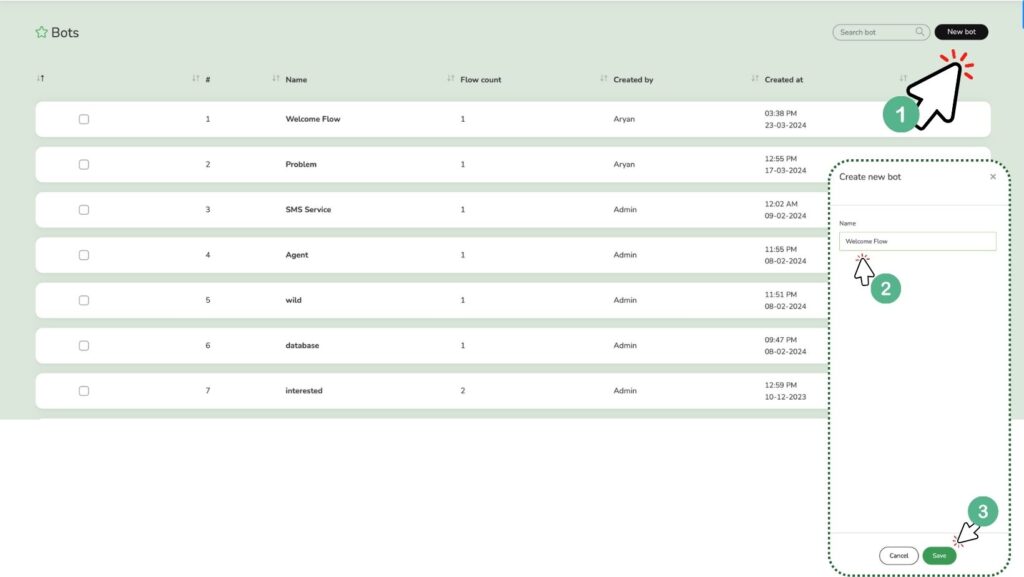
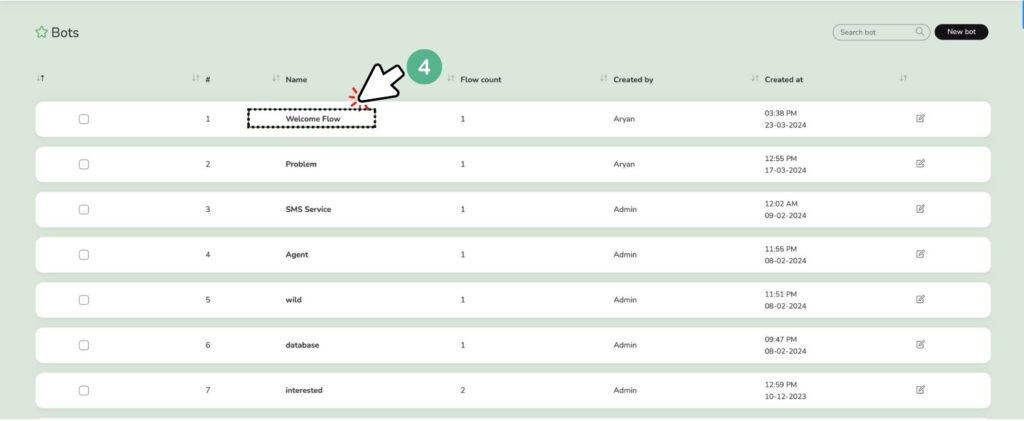
To create a chatbot, first of all you have to go to the bot option, then click on the Add New Bot button and mention the name of your first flow and save it.
Goto -> Bots Option
Click On -> New Bot and Give A Name for Your Bot Like Welcome Flow or whatever you want to give And Save It
Click On -> Given Flow Name (4) As we have mentioned Welcome Flow , you can select your flow name which you have created.
Step 3- Now Create A New Flow Of Your Chatbot
Now as soon as you click on the name, you will not be able to see a single flow inside the boat, for that you will have to create a new flow, remember that you can create as many flows as you want inside a boat, as if you created one flow. In which the customer is messaging you for the first time, secondly you have created a flow for your service, in this way you can create the flow by dividing it.
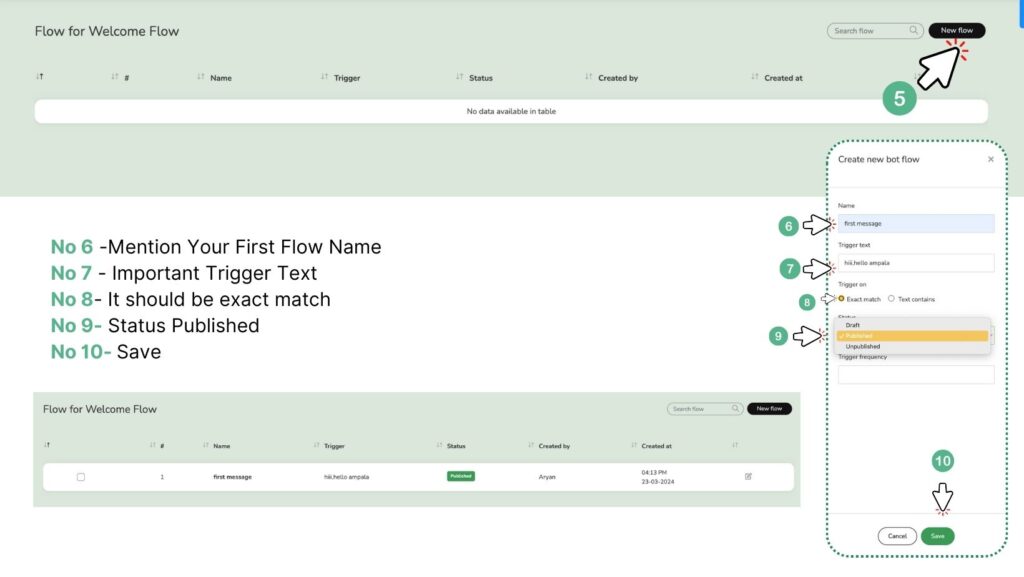
[ 6 ] Name – In the new flow, you have to enter the name of your flow in the name option like First Message Flow.
Name – नए फ्लो में आपको फर्स्ट मैसेज फ्लो जैसे नाम विकल्प में अपने फ्लो का नाम दर्ज करना होगा।
[ 7 ] Trigger Text – Trigger text has the most important role in WhatsApp chatbot automation, so here you have to mention the keyword with which your customer will send you a message for the first time, like if your customer sends you a message “Hi”,”Hello” , then your keyword will be “Hi”,”Hello” then you will get the same. to mention keywords
With this, whenever a new customer is messaging you with “Hi”,”Hello”, then whatever flow you have created, that message will automatically be sent to him on WhatsApp with the help of the chatbot.
[ 8 ] Trigger On – In the placement of trigger on, you will have to click on exact match so that the message will be sent only on the match of your keyword word.
[ 9 ] Status – If you want to activate this bot in the status, then click on Published. If you do not want to use it now and want to use it in the future, then you can click on Draft. If you want to stop the active bot, then you can click on unpublished.
[ 10 ] Trigger Frequency –Trigger frequency means if your customer is messaging you once by sending “Hi”,”Hello” then the message is sent in the first time but some customers message again and again, our bot sends this message instantly. If you want that if the customer send “Hi”,”Hello” to you again, he should get the response only after 30 minutes, then you can set the frequency from here.
Now You Have To Click On Save Button To Create Your First Flow
Step 4- Setup Response Message for customers
[ 11 ] To create a bot response, you have to click on the name of the flow, which will open a form, where we will create the responses of our bots by dragging and dropping elements. …WhatsApp Chatbot Automation

- Send Text Message – If you want to send only a text message in response to the customer, you can use the send text message element.
- Send Media Message –If you want to send an image, video, PDF or document in response to the customer, you can use the send media message element.
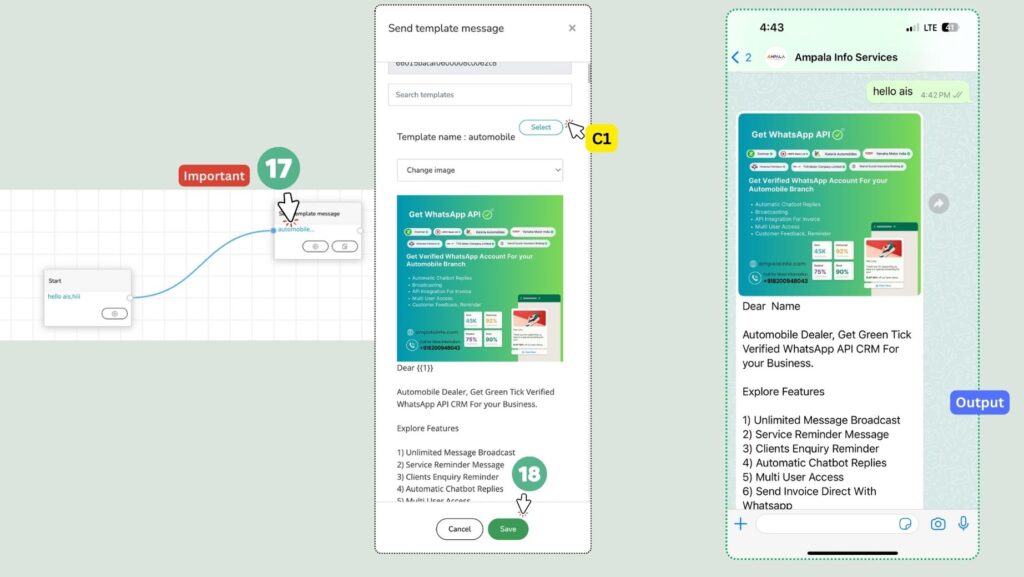
- Send Template Message – Whatever message template you have approved for broadcasting on WhatsApp, if you want to send that template to the chatbot, then you can send it with the help of send template message.
- Send Button Message – With the help of Buttons message elements, you can create interactive messages with buttons in the bot, so that your customer will respond to you by clicking on the buttons and further chats will continue automatically on WhatsApp.
- Send List Message –With the help of List Buttons message elements, you can create an interactive option selection message containing a list of your services or products in the bot, so that your customer will respond to you by clicking on the option and further chats will continue automatically on WhatsApp. …WhatsApp Chatbot Automation
Send Text Message
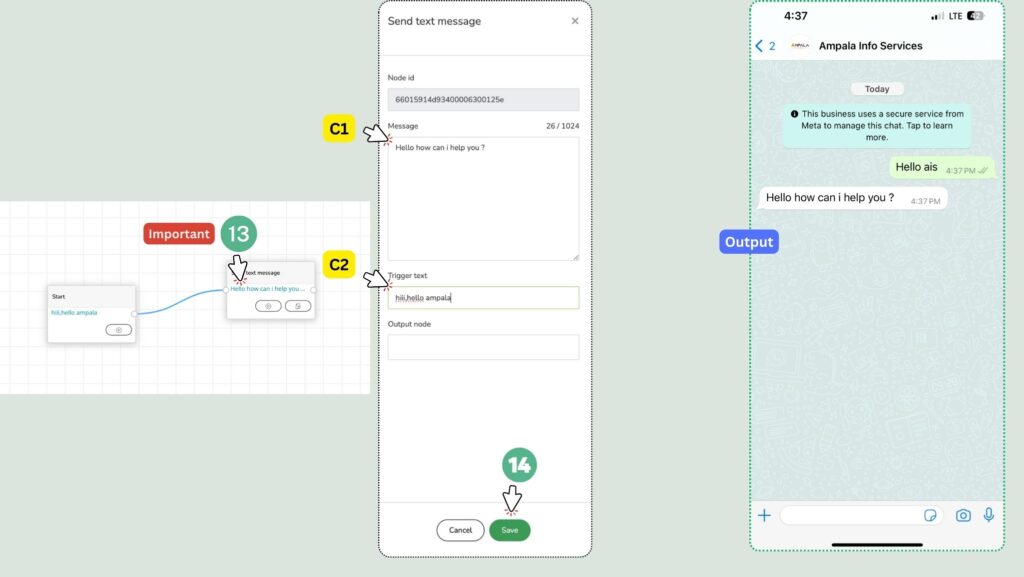
So first of all you drag the element of send text message to the form and click on the option of configure [13]. As soon as you click, the send text message form will open, where you will find the option of message [C1]. Whatever message is there, you have to enter it, like if the customer is messaging by writing “HI” Hello”, then the message ‘Hello how can i help you?’ will be sent to him, below that you have to enter the keyword in the trigger text [C2]. and have to [14] save it….for WhatsApp Chatbot Automation
Click to configure option once you drag a send text message elements
Point No 13 – It is very important to click on configure option
C1 – In Message filed Enter Your answer or question
C2- Trigger Text is important , once user send you “hi” Or “hello” then you c1 Message will send to that user, so you have to put your keywords in tirgger filed.
Point 14 – Save and test your message by sending any of the keyword
Send Media Message

Send Media Message
Click to configure option once you drag a send text message elements
Point No 13 – It is very important to click on configure option
C1 – In Message filed Enter Your answer or question
C2- Trigger Text is important , once user send you “hi” Or “hello” then you c1 Message will send to that user, so you have to put your keywords in tirgger filed.
Point 14 – Save and test your message by sending any of the keyword
Send Buttons Message
Click to configure option once you drag a send text message elements
Point No 13 – It is very important to click on configure option
C1 – In Message filed Enter Your answer or question
C2- Trigger Text is important , once user send you “hi” Or “hello” then you c1 Message will send to that user, so you have to put your keywords in tirgger filed.
Point 14 – Save and test your message by sending any of the keyword in WhatsApp Chatbot Automation
Send Buttons Message
Click to configure option once you drag a send text message elements
Point No 13 – It is very important to click on configure option
C1 – In Message filed Enter Your answer or question
C2- Trigger Text is important , once user send you “hi” Or “hello” then you c1 Message will send to that user, so you have to put your keywords in tirgger filed.
Point 14 – Save and test your message by sending any of the keyword

Send List Buttons Message
Click to configure option once you drag a send text message elements
Point No 13 – It is very important to click on configure option
C1 – In Message filed Enter Your answer or question
C2- Trigger Text is important , once user send you “hi” Or “hello” then you c1 Message will send to that user, so you have to put your keywords in tirgger filed.
Point 14 – Save and test your message by sending any of the keyword
ChatBot Demo
It is very easy process with ampala drag and drop tool to create a chatbot for your business
Step 1- Flow Creation
Lets See the example of whatsapp api chatbot automation
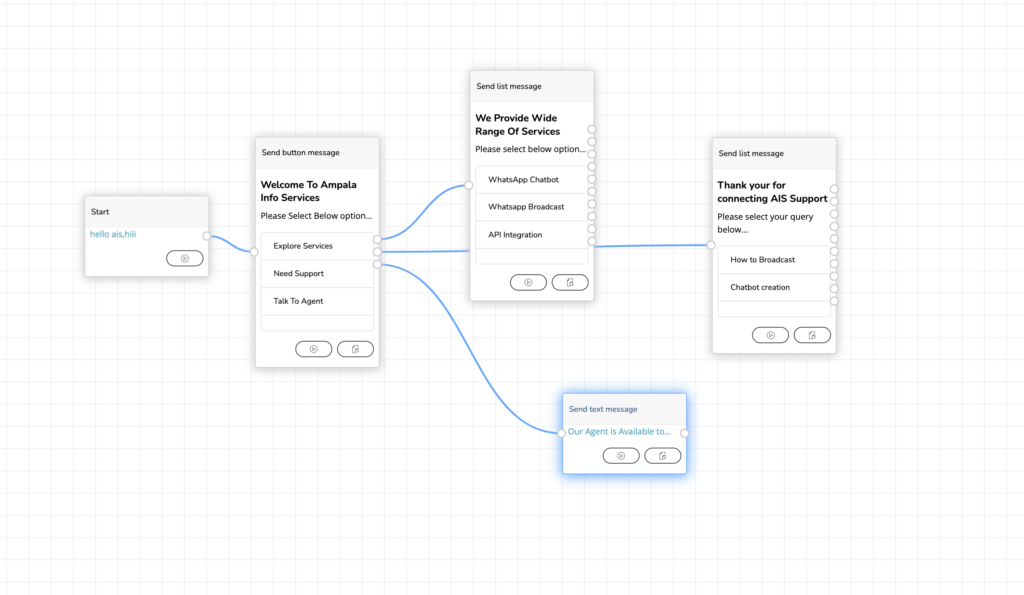
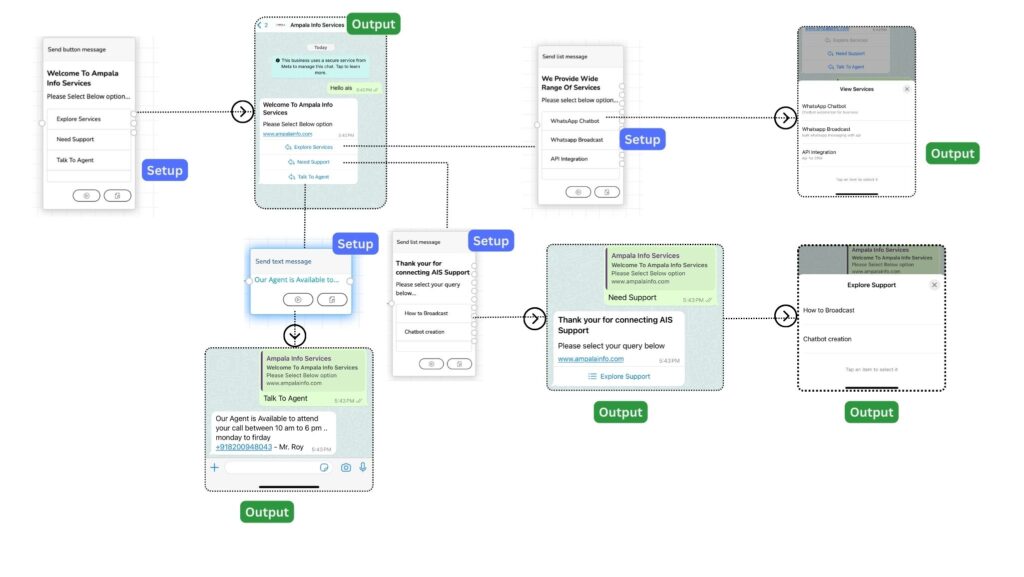
First we have to create a new flow for out bot, once your flow is created give name and Trigger text and status after that you have to click on the flow name to open drag and drop flow board, in the right section all the elements are available, here we have selected send button message template
1- Send Button Message – We have selected the text, but you can select as per you choice like image, video, document any thing which you want to send on your first message, now mention description about your first response, mention button text name like we have added three button 1- Explore Services, 2- Need Support, 3- Talk To Agent
after that you have to mention trigger text but developing first bot at that time you can put it blank but in second element you must have to enter trigger text